Version Control
Version control is a system that records changes to a file or set of files over time so that you can recall specific versions later. The benefits are at hand:
Every document can be backed up automatically and restored at a second's notice.
Every infinitesimal change can be recorded and can be used to revert a file to an earlier state.
Writing experiments can be sandboxed to copies while keeping the main file intact.
Teams can work independently on their own files, but merge them into a latest common revision.
Good VCS systems tag changes with authors who make them.
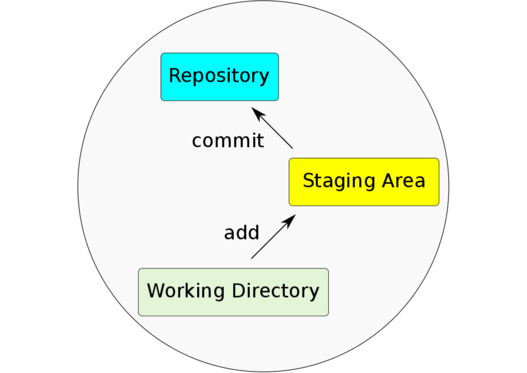
Files are added from the working directory, which always holds the current version of your files, to the staging area. Staged files will be stored into the repository in the next commit. The repository itself contains all previous versions of all files ever committed.
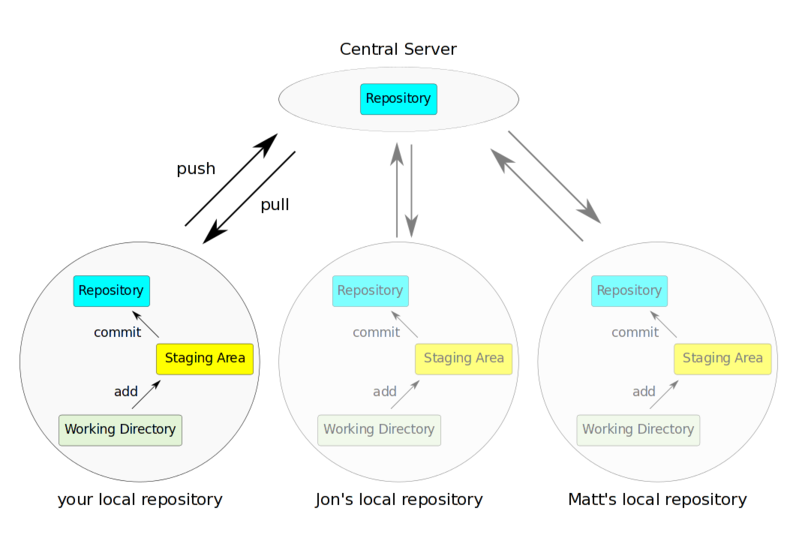
Distributed Workflow using a centralized repository. Here, three local copies of one central repository allow you, Jon and Matt to work on the same files and sync files between each other using the central server.
The git tool has many subcommands that can be invoked like git <subcommand> for instance git status to get the status of a repository.
The most important ones (and hence the ones we'll be focusing on) are:
initialize a repository
clone a repository
get information about a repository
view the history and commit messages of the repository
add a file to the staging area
commit your changes to your local repository
push changes to a remote repository
pull changes from a remote repository
retrieve a specific version of a file
you can read more about each command by invoking the help: :
$ git commit --help
$ git help commitBefore we start, we should set the user name and e-mail address. This is important because every git commit uses this information and it's also incredibly useful when looking at the history and commit log: :
$ git config --global user.name "John Doe"
$ git config --global user.email johndoe@embl.de
Other useful settings include your favorite editor as well as difftool: :
$ git config --global core.editor vim
$ git config --global merge.tool meldYou can use the git config --list command to list all your settings: :
$ git config --list
user.name="John Doe"
user.email=johndoe@embl.de
core.editor=vim
merge.tool=meld
color.status=auto
color.branch=auto
color.interactive=auto
color.diff=auto
...Turning an existing directory into a git repository is as simple as changing into that directory and invoking <init> git init. Here we first create an empty directory called new_repository and create a repository in there: :
$ mkdir new_repository
$ cd new_repository
$ git init
note
As a result, there should be a directory called .git in this directory...
Instead of creating a new directory, we can clone a repository. That origin repository can reside in a different folder on our computer, on a remote machine, or on a dedicated git server:
Local directory:
$ git clone ../other_directoryRemote directory:
$ git clone ssh://user@server/project.gitRemote git server:
$ git clone git@server:user/project
$ git clone git@git.embl.de:dinkel/linuxcommandlineIf you don't know in which state the current repository is in, it's always a good idea to check: :
$ git status

# On branch master
#
# Initial commit
#
nothing to commit (create/copy files and use "git add" to track)First, we'll create a new file: :
$ echo "First entry in first file!" > file1.txt

$ git status

# On branch master
#
# Initial commit
#
# Untracked files:
#   (use "git add <file>..." to include in what will be committed)
#
#       file1.txt
nothing added to commit but untracked files present (use "git add" to track)
Now we'll add this file to the so called `staging area`: :
$ git add file1.txt

$ git status

# On branch master
#
# Initial commit
#
# Changes to be committed:
#   (use "git rm --cached <file>..." to unstage)
#
#       new file:   file1.txt
#
This tells us that the file1.txt has been added and can be committed to the repository.
It might be a bit confusing at first to find out that git add does not add a file to the repository. You need to commit the file/changes to do that: :
$ git commit -m "message describing the changes you made"note
You MUST provide a commit message! git will ignore your attempt to commit if the message is empty.
If you do not provide the -m parameter, git will open an editor in which you should write your commit message (can be multiple lines of text). Once you save/quit your editor, git will continue to commit...
After succesfully committing, we can check the status again: :
$ git status

# On branch master
nothing to commit, working directory cleanYou can use git log to view the history of a repository. All previous commits including details such as Name & Email-address of the committer, Date & Time of the commit as well as the actual commit message are shown: :
$ git log

commit  <some hash value identifying this commit>
Author: <your name and email address>
Date:   <the actual date of the commit>

message describing the changes you madeIf we had cloned this repository from a remote location, we probably want our changes to be propagated to that repository as well. To push all committed changes, simply type: :
$ git pushnote
git "knows" from which location you had cloned this repository and will try to
push to exactly that location (using the protocol you used to clone: ssh, git, etc)...
warning
If you get a warning message, you probably 'just' need to pull others changes before you are allowed to push your own...
To update your local repository with changes from others, you need to pull these changes. In a centralized workflow you actually must pull changes that other people have contributed, before you can submit your own. :
$ git pullwarning
Ideally, changes from others don't conflict with yours, but whenever someone else has edited the same lines in the same files as you,
you will receive an error message about a merge conflict. You will need to resolve this conflict manually, then add each resolved file (git add) and commit.
Undo local changes *
One of the great features of using version control is that you can revert (undo) changes easily. If you want to undo all changes in a local file, you simply checkout the latest version of this file: :
$ git checkout -- <filename>warning
You will loose all changes you made since the last commit!
When you want to use one central repository, to which everybody can push/pull, you should initialize this repo like so:
$ git init --bareBasically what this does is create a repository which all the files from the .git directory in the working directory. This also means that you should never add/edit/delete files in this directory. Rather clone this directory in another folder/computer, edit files there and commit/push...